background

Spice Mag

  • home
  • Blogging
    • Sub Menu 1
    • Sun Menu 2
    • Sub Menu 3
    • Sub Menu 4
  • SEO
    • Follow us on Twitter
    • Find us on Facebook
  • Google
    • Google Analytics
    • Keyword Tool
    • Sub Menu 3
    • Sub Menu 4
  • Social Media
    • Contact us

Categories

  • Backlinks
  • Blogger
  • Blogging
  • Google
  • JavaScript
  • Keyword Tool
  • SEO
  • Scrapebox
  • Social Media
  • Traffic

Facebook Fanpage

Recent Posts

Showing posts with label SEO. Show all posts

bigstock SEO flow chart on a whiteboard 30908507 3 Ways to Transform Your Blog Into a SEO Machine
When my daughter turned two, the only people that showed up to eat birthday cake at the party were immediate family members – mom, dad and her big brother, Adam. Why? Because we didn’t send out invitations or put any effort into getting guests to show up.
While this may be perfectly fine for a family event or a toddler that doesn’t know the difference, who wants to put time and effort into a business blog if readers aren’t showing up? Over 80% of blogs stagnate with no traffic and few readers but, like Jillian’s birthday party, the problem often lies with how people are invited to participate.
Simply having one doesn’t make it generate results.
What are the most effective ways to get blog posts read?
  • Sharing on social media
  • Using an email list to distribute new posts
  • Purchasing Google or Facebook advertising to drive awareness
  • Search Engine Optimization (SEO)
Using ALL of these options is ideal, but if you can only chose one, then SEO gets my vote every time.
If you have a few hours to invest, here are 3 ways to transform your WordPress blog (or website) into a search-friendly traffic generator.  All of them are free, other than the time you’ll invest.

1. Install a good SEO plug-in.

My favorite free SEO solution is WordPress SEO by Yoast, which makes it easy as red light, yellow light, green light. Pretty easy, right? Make sure to keep in mind that simply installing this plugin isn’t helpful in and of itself – but many bloggers stop at this first step. Its real power lies in understanding how to use it correctly and choosing the right keywords.

2. Do keyword research.

Head over to the Google Keyword Popularity Tool and invest some time in keyword research to better understand which keywords drive the most traffic. The trick with keywords is to never assume you know which ones are best; ALWAYS do research to ensure you are using popular keywords that best suit your product, service and/or blog topic.
If you use localized keywords for your SEO efforts – such as “az life coach” or “life coach in phoenix” instead of just “life coach,” you are much more likely to rank well – with the added benefit of landing more targeted readers. This is especially important if you are a local business.
I recommend creating a free account on AdWords (or log-in to your account, if you already have one), then search for the keywords you think are most likely to be searched. Adding your city and state will give you local search results to review, plus some great ideas for blog posts that fit what people are looking for. Using the keywords you entered, Google will bring up a list of other relevant keywords that were actually searched for in the previous month. I prefer to export them to Excel, get rid of unnecessary columns, rank them from most to least popular, then save the document for easy reference later.

3. Choose one keyword, then include it in your post permalink, title, and first sentence.

Make sure you have WordPress set to name the page URL as your post name (which can be changed in settings> permalinks> post name), this will automatically put the keyword in your post URL – also called the permalink. This is an essential component for SEO success.
Then, simply use the default text for the “SEO title” field at the bottom of the page (which is your title plus the name of your blog), and copy the first sentence of the post into the “Meta Description” field. If good writing dictates NOT using the keyword in the first sentence (which happens often but is not optimal), then paste in the first blog sentence that DOES have the keyword in it, or write one that uses the keyword and describes the post in a way that people will want to read it. Put the keyword in the “Meta Keywords” field, then you are all done.
SEO magic happens when you identify one keyword to focus on, then put it in the trifecta of permalink, page title, and page description.
Make sure that keyword is included in the body of post a few times, is relevant and appropriate, and then hit publish. While there are other steps and tactics that help boost SEO, that’s fodder for another article!
One last note – be sure and offer multiple ways for readers to subscribe. If you can’t convert them to subscribers via email or RSS and/or they aren’t seeing your new posts show up on social media, odds are good that they won’t think to return to your site. Your SEO may bring them to your blog the first time, but it may not bring them back. Keep this in mind as you consider and implement these strategies.
Want more detail on mastering Yoast and SEO? Head over to the Yoast Definitive Guide to Better Ranking.
Robots.txt contains the guidelines or rules for the bot-crawlers about how they will crawl and index your website or blog. Blogger allows to set some very basic SEO settings very easily from the dashboard. One of them is setting a custom robots.txt for your blogger.

When a robot search engine crawler is visiting a page or website, robots.txt is the first thing it looks for is the robots.txt file. As a Blogger user you now have the option to control what the search engine crawlers should follow and index from your website or blog.

Every blogger blog has a default robots.txt but with advanced changes in blogger you can change it according to your needs. In this post, you will know about the default robots.txt of blogger, how to add or edit a custom robots.txt for your blogger blog and some useful examples of robots.txt with an adsense friendly one. So let's get started.

Default Custom Robots.txt of Blogger Blog

Every time you create a blog in blogger a default robots.txt is created and until you change it by the setting is dashboard it remains same.
User-agent: Mediapartners-Google
Disallow: 

User-agent: *
Disallow: /search
Allow: /

Sitemap: http://yourblogslink.blogspot.com/feeds/posts/default?orderby=UPDATED

It is same for each blog and it is adsense friendly. If this is able to satisfy your SEO need for the blog that you do not require to replace it by adding a custom one in by dashboard settings.

How to Add Custom Robots.txt in your Blogger Blog

Follow these instructions below;
    1. Go to your blogger dashboard > Settings > Search Preferences > Crawling and Indexing.
    2. Click 'Custom robots.txt' > click 'yes'.
    3. Paste you custom robots.txt. (An example is given below)
    4. Click 'Save changes' to save the custom robots.txt.
    How to Add Custom Robots.txt in Blogger

    That's the way to insert or edit custom robots.txt. Now let's see how to write a custom robots.txt for blogger.

      A Proper Custom Robots.txt in your Blogger Blog

      The following example is a proper robots.txt for your blogger.
      # robots.txt of mysite.blogspot.com thanks to techinfoknow.com
      User-agent: Mediapartners-Google
      Disallow:
      User-agent: *
      Disallow: /search
      Disallow: /p/*
      Disallow: /view/*
      Disallow: /?m=1
      Disallow: /?m=0
      Disallow: /*?m=1
      Disallow: /*?m=0
      Allow: /
      Sitemap: http://yourblogslink.blogspot.com/feeds/posts/default?orderby=UPDATED
      Sitemap: http://yourblogslink.blogspot.com/atom.xml?redirect=false&start-index=1&max-results=500

      The above example is an adsense friendly custom robots.txt for your blogger. Now we will explain what each line means here and what more you could add to your custom robots.txt.

      Tips for Writing a Custom Robots.txt for Blogger Blog

      • # robots.txt of mysite.blogspot.com thanks to techinfoknow.com
        This a comment line. You can add more and this will not affect you sites SEO or robots crawling what so ever. I suggest you to keep this line on if this post is helping you.
      • User-agent: Mediapartners-Google
        Disallow: 

        These lines are only for the adsense crawler. If you are or want to display adsense ads; this line allows the adsense crawler to visit all the pages of your site as per the adsense guideline. If it is not required you can simply remove them from the robots.txt. Then the adsense crawler will follow the instruction you have set for all the crawlers.
      • User-agent: *
        This is used for all the crawlers (except ones for which a separate rule is set, here the adsense crawler) and all instructions are written below it.
      • Disallow: /search
        This line indicates that any page with /search in the URL will not be crawled and indexed by the crawler. These line is very important for making your blog SEO friendly as it stops search engines to stop indexing label, search query, archive pages. Because they are not a unique page or URL and also to avoiding duplicate content.
      • Disallow: /p/*
        To block robots to crawl the pages for your blog. But if you want your pages to be indexed by crawler then just delete this particular line.
      • Disallow: /view/*
        Stops crawling of the blogger's %%% links. If you are using %%% views then just remove this line and if you are not using it them don't remove the line.
      • Disallow: /?m=1
        Disallow: /?m=0
        Disallow: /*?m=1
        Disallow: /*?m=0

        These lines are here to stop robots crawling of mobile redirect pages. If you do not use them, you might see your blogs links in mobile search results have ?m=1 or ?m=0 with them. They are necessary to avoid the duplicate pages problem. If you are not facing these problems or if you don't need them you can remove them.
      • Allow: /
        After you adder the instructions for restricting crawling, these line tells the robots that other links in these blog are free to crawl and index.
      • Sitemap: http://yourblogslink.blogspot.com/feeds/posts/default?orderby=UPDATED
        Sitemap: http://yourblogslink.blogspot.com/atom.xml?redirect=false&start-index=1&max-results=500
        These lines basically indicates the links to you blog's site map(s). Replaceyourblogslink.blogspot.com with your blog's URL. If you are using a custom dommain in your blogger blog, then use that URL.

      More Expert Tips on Custom Robots.txt in Blogger

      Now some additional tips for customizing the robots.txt for your blog.

      Prevent a Certain Page from Crawling and Indexing

      For preventing a certain page, post or link in your blog all you need to do is to add a new disallow rule afterUser-agent and before Allow: / like this:-
      Disallow: /p/secret-page.html
      Disallow: /2014/01/secret-post.html

      As you see, all you need to is to add the link after the yourbloglink.blogspot.com. Now if you want to stop crawling posts from a particular year add Disallow: /2014/* and posts from a particular month of the year add Disallow: /2014/01/*. As you see you can go nuts according to your needs.

      Adding Separate Instruction for a Particular Robot Crawler

      If you want to add crawling instructions for a particular robot add this line:-
      User-agent : Name of the bot
      Then add the Disallow rules and Allow rules respectively. In place of Name of the bot you need to add the particular name(User agent) for your desired robot crawler (List of robot crawler).

      Adding More Sitemap

      You can add multiple sitemaps in the robots.txt. Sitemap: http://yourblogslink.blogspot.com/feeds/posts/default?orderby=UPDATED is default for every blogger blog, but you can add more. For example: Sitemap: http://yourblogslink.blogspot.com/atom.xml?redirect=false&start-index=1&max-results=500; this is for the first 500 post for your blog. You can add more. Here are some useful links to understand blogger sitemaps.

      Stop robots to crawl the Entire Blog

      Do not want the any robot. Then delete everything and use;
      User-agent: *
      Disallow: /

      Or stop a particular robot to crawl your blog, then use;
      User-agent: Name of the bot
      Disallow: /

      Check and Analyze your Robot.txt

      There are many tools available in the web for checking your robots.txt. But for checking how the google robots (i.e..Adsbot-Google, Mediapartners-Google, Googlebot) will crawl in your blog you should use google-webmaster's tool. For this; go to your website's webmaster dashboard > Crawl > Blocked URLs. Using it you can see how these robots works on your blog according to your specified robots.txt.

      That all you need to know about blogger custom robots.txt. Hope information on this post have helped you. 
      You can set and edit your blog's robots setting now from the Blogger's dashboard settings. With new advance changes in Blogger dashboard, Blogger blogs have now become SEO friendly. Before that your blog’s indexing and SERP (search engine results page) listing was at the mercy of the search engine crawlers.

      Only way you could implement robots tags in your Blogger blog by manually adding Meta tags to the template of the blog. But this didn’t help you as there was no way to add separate robots tags for each page and posts. It was one of the reason Blogger was lacking behind in SEO settings and user friendliness from other blogging platforms.

      Now you can set and edit robots tags for the Blogger blog's home page, index pages (i.e. labels, archive pages) and for each individual posts and pages. This gives you complete and proper control over your blog’s SEO. In this post we will see how to:
      • Robots Meta tags for blogger and their meaning.
      • How you can add Robots tags your entire Blogger blog.
      • What you Robots tags should tick/use for each type of page in the Custom robots header tags settings.
      • Adding/Editing Robots tag for individual Blogger posts and pages.
      • Checking if the Robots tags are working.
      Now that you have an idea whats coming, let's Dig in.

      Meaning of Robots Meta Tags for Blogger Blog

      Before you set robots tags for your blog you must what each tags means and how they will impact your blog’s Indexing in search engines like Google and Bing. Let’s look at the table below; 
      Robots TagGoogleBingMeaning and Descripting
      AllYesNoNo restrictions for indexing the page. This is default for all pages. Do not worry if you are not using it.
      nofollowYesYesDo not follow the links on the page.
      noindexYesYesDo not show webpage in search results and do not show a "Cached" link in search results.
      noneYesNoCombination of noindex, nofollow
      noarchiveYesYesDo not show a "Cached" link in search results.
      nosnippetYesNoDo not show a snippet in the search results for this page.
      noimageindexYesNoDo not index images on this page.
      notranslateYesNoIn search results, do not offer translation of this page in other languages.
      noodpYesYesDo not use metadata from the Open Directory project (DMOZ) for titles or snippets shown for this page.
      unavailable_afterYesnoDo not show this page in search results after the specified date/time. Date/time must be specified in the RFC 850 format. (11 Oct 2014 18:00:00 BST)

      Using "All" tag is not essential but not harmful. Crawlers will automatically crawl and index you blog without the header tag "All". It's the other restrictive robots tags you should properly use. As we have an idea about these robots tags, now try to implement them in the blogger.

      Adding Robots Tags to Entire Blogger Blog Properly

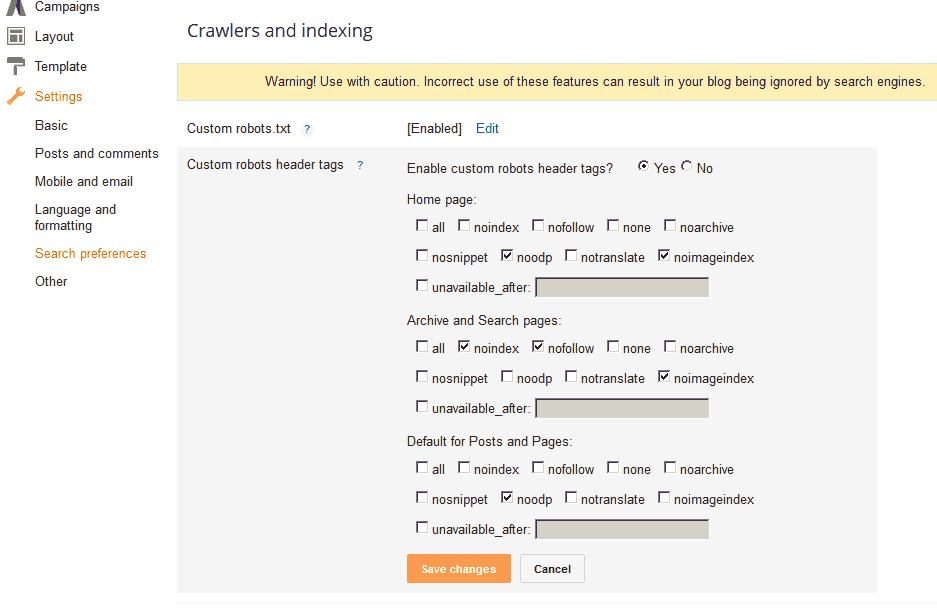
      Now For adding Custom Robots Header Meta Tags to the blogger blog,
      1. Go to your Blogger blog's Dashboard, > Settings > Search preference > Crawlers and Indexing.
      2. Click "Edit" beside "Custom robots header tags".
      3. Tick "Yes" radio button.
      4. Now Set the header tags for "home page", "archive and search page", "default for posts and pages" according to your blog's need.
      5. Click "Save changes".
      That's it you have set custom Robots tags for your blog.

      What Robots Tags should you Tick/Use for your Blogger Blog

      Now question still remains what are tags you should tick in the "Custom robots header tags" setting in blogger. For this you should properly analyze you blog. As you see the "Custom robots header tags" setting in blogger is divided in three parts; "home page", "archive and search page" and "default for posts and pages".

      Optimized way to add Custom Robots Tags in Blogger


      Now take this particular blog for example and try to find what's appropriate for this blog in custom header tags. 

      Robots Header Tags for Blogger "home page"

      You definitely allow search engines to index your blog's home page. However, your home page also is a accumulation of summary of your posts and contains snippet with automatic small sized image. These images might be problem and will be treated as a duplicated item by the crawlers. So, here just tick "noimageindex" for the home page. This will not impact your home page's visibility in the search engine.

      Robots Header Tags for Blogger "archive and search page"

      This section is for archive and search pages or the label pages of the blog. As you know label pages shows the links and it may contain the summary of your posts in the blog with auto-generated image or your full post depending on your blog's templates and use of jump breaks.

      Whatever the case may be you do not want the label pages to be indexed by the search engine. This will reduce your PageRank and SERP position severely and search engines will treat them as auto-generated pages with duplicated content. Google ignores both auto-generated and and duplicate pages in a website/blog. Label pages have both qualities.

      So; you want to set "nofollow" and "noindex" as robots tag for the archive and search page or label pages. And as a bonus use "noimageindex" for the same reason as home page.

      Robots Header Tags for Blogger "default for posts and pages"

      Generally, you want these post and pages to be indexed. So, leave it empty and do not tick any tag here. If you want to different tags for your particular posts and pages; after saving your work in "Custom robots header tags" you can do it from the post/page editor.

      Also if your are using meta description for your blog properly then you should tick "noopd" for each category as it prevents search engine to import metadata from Open Directory project (DMOZ). 

      You must note; these suggestions are made for a typical blogger blog. If your blog very different then you should set the custom robot's tags according to your blog and its content. Use them Properly and it will help increase your search engine visibility and PageRank.

      Add Robots Tag for individual Blogger Posts and Pages

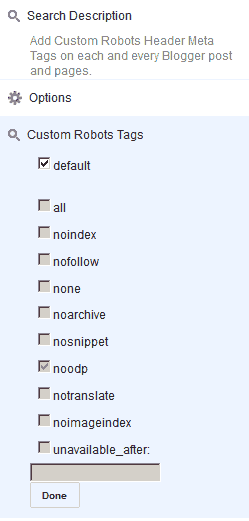
      After enabling and saving your settings in "Custom robots header tags"; you can now set separate robots tags for each post and page in the Blogger. For this; when you are writing in the post/page editor (creating a new post/page) click the "Custom Robots Tags" on the right under post settings.

      After clicking it you will see that "default" option is ticked. It means that whatever you saved in the "Custom robots header tags" for "default for posts and pages" will be implemented.

      Add Robots Tag to Blogger Posts and Pages Separately


      For making changes of Robots header tags; first untick "default" option and tick the tags you want save your post/page and click publish.

      Check if the Custom Robots Tags are Working

      You do not have to worry about the "Custom robots header tags" as they will work properly and you do not need to make any changes to the template of the blog or any other settings for that. But I know you have a curious mind and you want to see if your settings are showing and working.

      Ensure Custom Robots Header Meta Tags for Blogger Working

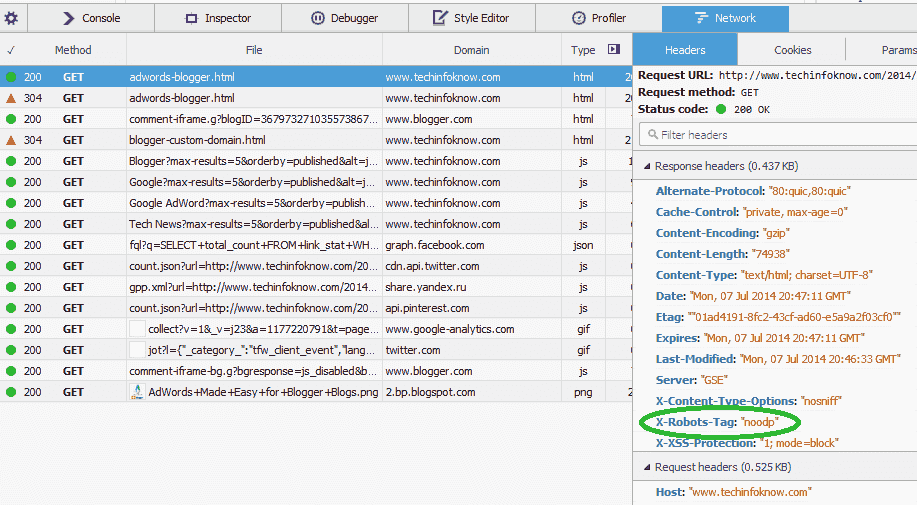
      You will not find them in the page-source view of your blog's pages as they are not implemented in the template of the blog. These tags can only found in HTTP header fields as Google accepts robots tags which are directly added to the Headers of the HTML Page. Once you applied the custom robots tags follow these instructions for any Blogger page types.
      1. Go to you blog and view any page.(Home/posts/pages/label-pages)
      2. In major browser; right click on the blog's page and click "Inspect element". This will open the "Developer Tools" in the browser. Also can open it :
        For Chrome, go to Menu > Tools > Developer Tools > Networks or keyboard shortcut "CTRL+SHIFT+I".
        For Firefox; Menu > Developer > Network or the keyboard shortcut "CTRL+SHIFT+Q".
      3. Click the "Network" tab.
      4. From several columns/items, find the URL of the current page and click it.
      5. You will see two sections on the displayed information "Request Headers" and "Response Headers".
      6. Under "Response Headers"; you will find "X-Robots-Tag" along with you selected robots tags. (Image above)
      This proofs that the custom robots header tags are working. Hope Tips in this post helped you to improve your blog's SEO. Don't hesitate to state you problem using the comments section below.
      You want traffic.
      You want relevant, targeted traffic that will convert.
      Yes, we all know you need to have great content, do SEO and share on Social Media.
      But there other viable ways to get traffic.
      Here are 9 killer ways you can get traffic without SEO or social media.

      1. Find And Pull Method

      This is perhaps one of the easiest ways to bring traffic to your blog. All you have to do is find popular blogs in your niche and bring the already existing traffic back to your blog. Sounds easy right? Well if you know how, it kind of is.
      • For this method to work, you need to find out about relevant posts on high traffic blogs in your niche as soon as they are published. You can solve this problem using Google Alerts, which is a free Google service that sends you emails on new content across the web that may be of interest to you. Set up Google Alerts so that it sends you an email as soon as a popular blogger writes an article very closely related to a post you have previously published (We will get into how to set it up soon).
      • For the second step go to the post as soon as it is published, actually read it, and write out a relevant and helpful comment after the post but instead of linking your name to your blog’s homepage, link to your post on related content. This way when they click through, they are immediately on a highly relevant page that they are interested in. And because they read your comment, which was useful and unique, they already think of you as an authority.
      Here is how you set up Google Alerts. Where it says search query, type in a term related to one of your posts that you want to bring traffic to. 
      Google Alerts Search Query

      Set results type to blogs. How often to once a day. How many to only the best results.
      These settings will make sure that you only get relevant posts from popular blogs. If you don’t mind getting a lot of emails you can even set the How often setting to As-it-happens, which will give you a higher chance of getting there before anyone comments. You can go back and set up as many alerts as you want for as many of your posts as you like.

      2. Viral Content Buzz Community

      Viral Content Buzz is a place where you can earn points for sharing other people’s content and use those very points to get other people to share your content.
      Yes, I realize this post isn’t supposed to have social media related methods for getting traffic, but Viral Content Buzz doesn’t really have to do as much with social media as it has to do with showing your content to a community. There is no crazy social media tool, strategy or trick involved. You simply have to submit your content to the site and it will send traffic your way.
      On some level it’s nothing more than a place where competent people from different niches gather to share quality content. Now, if you happen to like something shared by someone, you can help them out and Tweet it or Like it on Facebook. The more you participate in the community and share other people’s content, the more exposure you can get for your content.
      Viral Content Buzz thoroughly checks your social media profiles to makes sure that your Facebook and Twitter profiles that you are using to promote other people’s content are real profiles with real followers and plenty of activity. This makes sure that none of the people joining the community are looking to take advantage of it. Because these are real people with real followings that are genuinely sharing your content, you get a lot of visibility and traffic.
      Join Viral Content Buzz and submit your best content. Your content will be shared by people that would not have seen your articles otherwise and you will get traffic that is genuinely interested in reading what you have to say.

      3. Derek Halpern’s Drafting Technique

      This is a technique popularized Derek Halpern of Social Triggers. The drafting technique takes advantage of your competitors slip stream much like Nascar drivers do. What does that mean? Well, in Nascar (as well as bicycling and other racing sports) each competitor tends to stay right behind the one in front so that they have to deal with less air friction. As the first car spends more energy pushing through the air, it creates a slip stream right behind where there is less air density for the next car to push through. This means that the second car has to spend a lot less energy to achieve the same results.
      Here is how you use the slip stream to your advantage. The idea is simple. You see your competitors somehow land an article on big sites and get huge coverage. Instead of feeling sad about it, you can use this to your advantage to get coverage for your own business or website as well.
      When you see that someone in your niche has gotten a post on a huge site, you learn two things:
      1. This particular site accepts guest posts.
      2. The kind of topics they are looking for in their guest posts.
      With this knowledge in hand you can contact the blog or main stream media site and pitch them a similar idea for a guest post you they will be happy to publish. They already published something similar so you know they would be happy to do so again. There is simply less friction. Just make sure it is not actually the same idea and that it is something similar that will add some value to their site.
      Find blogs that are authorities in your niche and take a look at their posts that are guest posts. Make a list of similar ideas you can blog about and send them an outreach email pitching them a one or few of those ideas those ideas. Mention the similar posts already published on their site and tell them why you think your post will be just as good and maybe even better.

      4. Link To Bloggers In Your Posts

      Link to other bloggers in your post. That’s really all there is to it. One of the biggest mistakes you can make is never linking out. Link out to others in your posts and they will take notice of you, most of them will tweet about your post at the very least. Some of them will even link back to you. This is a easy and free way to get traffic. Just don’t forget about your readers and make sure that the links are relevant.

      5. Use The Intro Method To Get Massive Forum Traffic

      Using Forums to drive traffic is pretty well known. It’s also one of the easiest way to send traffic to your site.
      Here is how you use forums to send massive traffic. This method was originally talked by Diggy at ProBlogger in much more detail. Go to a forum you participate in regularly and simply start a new thread mentioning your newest post like Diggy.
      forum post
      Think about it. If you were at your favorite forum and you saw a thread to a link that was actually interesting and full of useful information, wouldn’t you be inclined to check it out? Make sure your title is catchy and if your forum is in your niche and it has a high enough traffic, your results should look something like this:
      forum links
      Some forums have rules against this kind of thing so check the guidelines first. If this seems like something that’s in the grey area for a particular forum, you can start your thread with simply giving out free information or part of your post and end it with saying “you can find more tips on how to get traffic here”. If people liked what you had to say or found it useful, chances are they will check out the link.

      6. Do Interviews

      Interviews are like video guest posts. Interviewing someone is also a bit like linking to someone except now they are much more likely to share and link to the interview. There are advantages to both being the interviewer and the one getting interviewed.
      • Why Be Interviewed – Obviously this sends traffic, but more importantly this establishes you as an authority in your niche. Why would anyone waste time interviewing someone who isn’t important? Because you will be seen as an authority, people who come to check out your blog or website will be more likely to stick around and comeback.
      • Why Interview – If you interview someone and post it on your blog, chances are the person you interviewed is going to share it in every way that he or she can think of and probably even link to you. Interviewing someone who is important makes you seem like a bit of an important figure in your field as well. You become an authority by association. Say for example you saw a post by some random blogger where he interviewed Sir Richard Branson on video. Wouldn’t you suddenly think that this blogger is someone important?
      Use HARO to get interviews and be interviewed. HARO stands for Help A Reporter Out and is a service that used by news agencies like ABC and FOX. Here is how HARO works.
      When you go to HARO, you can sign up as a reporter or a source.
      If you sign up as a source, you will get emails with a list of people who are looking to interview experts in different fields. Each interviewer will give a summery as to what they are looking for in their interviewee, which looks something like this:
      HARO Email
      If you qualify, and would like to be interviewed, you can simply send them an email saying so, and you will almost always get a reply immediately. By using HARO, you may be able to land yourself an interview on a huge mainstream media outlet.
      If you sign up as a reporter, you just have to fill out who you are looking to interview in what subject every time you want to do an interview and your request will be there in the next email.

      7. Use Your Email Signature.

      Let all those emails you send work harder for you. Place a link to your website in your email signature. People are lazy and don’t like to take time to find out what your site is or even bother typing it in the URL bar. So make it really easy for them. Make your site only a click away by placing a link to it after your name in your signature. If you use Gmail, there are plenty of other things you can do to use Gmail like a marketing machine.
      This makes a bigger difference than you think. Steve Krug in Don’t Make Me Think talks about how every action you are asking people to take causes the number of people to go through with it to drop drastically. Why force people to take more actions than necessary?

      8. Be A Case Study

      Businesses and people always need testimonials saying that their product or service works. Be that testimonial. If you end up being a case study that they showcase on their site, it can end up sending you a good amount of reoccurring traffic as well as establish you as someone of importance. If you try a product or service in your niche and found that it was useful, send them an email saying that you use the product and it did this and that for you. Be detailed in how it helped you.

      9. Take Advantage Of Communities like Bloggers.com

      Bloggers is a huge community of bloggers from every niche. Participating here will send you the best kind of traffic because everyone here is capable of linking to you. Not only will you directly get traffic to your blog from Bloggers but you will also end up getting traffic from any of these visitors who end up linking to you.
      Getting traffic from Bloggers is simple. Create a full profile like and just start exploring. Find people in your niche that interest you and comment and vote on their profiles or blogs. Most of the time they will vote you back and you will end up getting that much more exposure in the community.

      Connect With Us

      Recommend us on Google!

      Recent Posts

      • Comments
      • Tags
      Backlinks Blogging Google Google Analytics Guest Posts JavaScript Keyword Keyword Research Keyword Tool Link Building Parallax Scrolling Effect SEO Scrapebox Social Media Social Media Tools Speed Up Site Traffic Webmaster Tools WordPress SEO

      Latest From

      About Us

      Specialized in marketing research and analysis. Current focus is blogging and home based affiliate business as a work-at-home scheme and freelance writer on topics related to Website Optimization (SEO), Blogging, and Tech. And also specializes in SEO, HTML, CSS and Photoshop.

      Quick Links

      Follow Us

      Copyright 2014 Create Own Blogs. All rights reserved.

      Designed by CreateOwnBlogs.