
If your analytics isn’t properly configured from the beginning, how could you ever expect to gather any insight?
When it comes to gathering visitor information, GA can’t collect or change data on visits that have already happened, which means time spent waiting to add or correct certain settings is data lost or damaged. Getting a jump start on collecting the right data is the first step to using that data for successful conversion measurement and tracking.
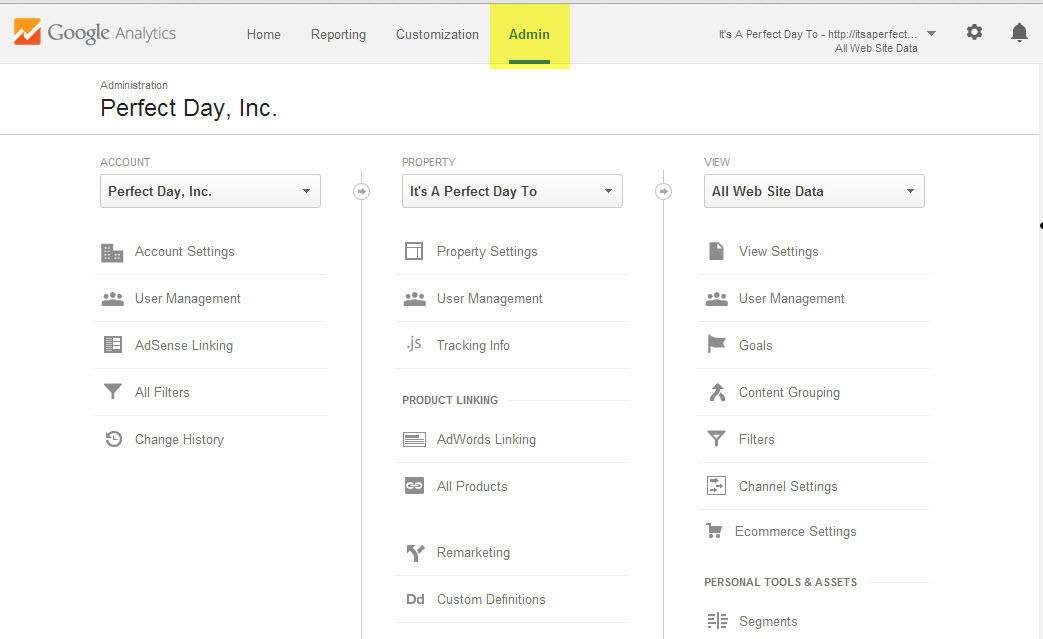
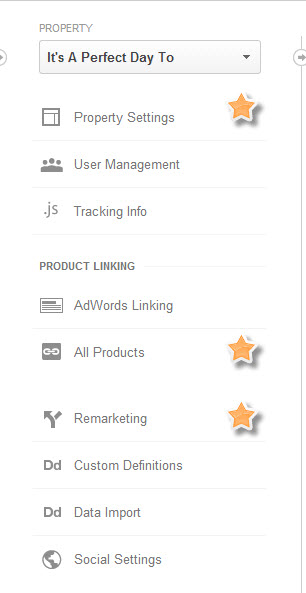
With that in mind, we’ll cover features at the Account, Property, and View levels in your Google Analytics setup you should be reviewing and using. All the tools, settings, and changes we’ll be talking about are accessed from the Admin section of your Google Analytics account, as seen below.
Organizing and Structuring Your Accounts, Sites, & Views
First it helps to take a quick look at how Google Analytics accounts are set up, and how your sites and reports are organized inside those accounts.
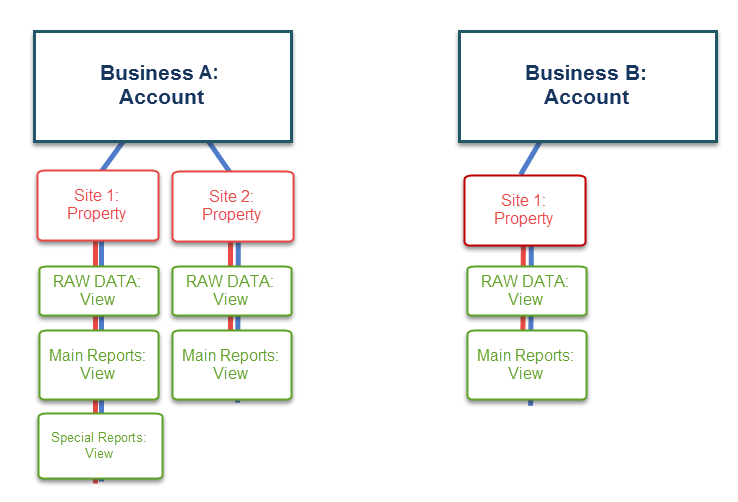
Each user of Google Analytics can have multiple accounts. Underneath each account exists one or more Properties, which are your individual websites.
Views, formerly known as Profiles, are where your reports live, and an array of options allows you to set high level rules that affect how you see all your Analytics reports. Settings for Ecommerce data collection, Site Search data, Goals, Filters, Segments, Annotations, Channel Groupings, Custom Reports, Content Grouping, and even Users can all be set at the View level.
Each Property (website) can have multiple Views, and creating additional Views opens up the possibility for deeply controlling and focusing your visitor data through the use of different Goals, Filters, and settings on each View. The main limit to Views is that they only collect data from the time they are created and forward, so if View #1 were created in January, and View #2 were created in July, View #2 would not have the data from January through end of June.
Create a Raw Data View to Dodge Data Loss
There are many Views you can create to Filter and section out your data, but the very first additional View you should create is one for “raw data”. This View should have only features that involve collecting data directly from trackers or Google: Ecommerce, Site Search, Webmaster Tools, AdSense, and Adwords. It should not use Filters or have Goals set up.
The Raw Data View ensures there is always a place to check what is being captured by your tracking code without any Filters or changes applied, providing a kind of sanity check for changes to your other Views.
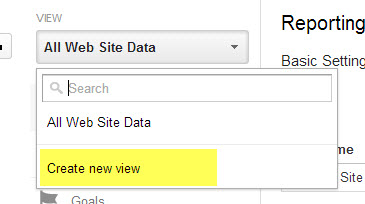
If you’ve never created an additional View or changed the settings, your default View will be named All Web Site Data, and this one can function as your main View. Pull down the View menu within Admin and select “Create a new view”.
Name this one Raw Data or RAW DATA, set it to your time zone, and click Create View.
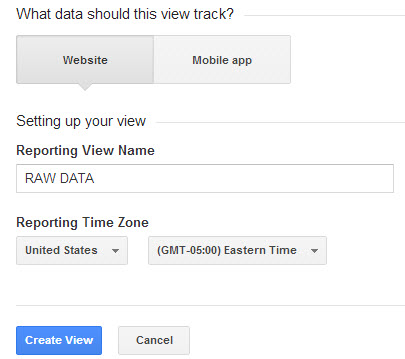
Once you’ve done that, you’ll want to activate Ecommerce and/or Site Search, authorize any Google products you have linked and that’s it. No other settings or Filters should be set up on this View.
Account Organization and Multiple Accounts
Follow the Keep It Simple principle with names, just apply the parent business name, or the website name itself. This will make your account labels clear, and searchable.
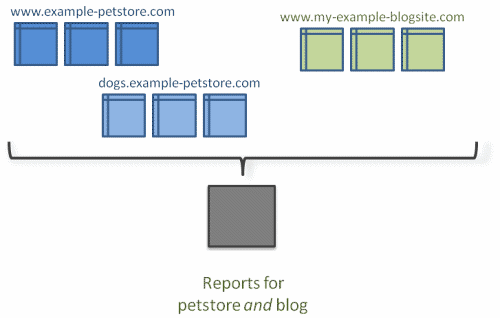
Each unique website for a business should have a Property set up to house it. Say for example you have an online store selling custom painted yoga mats, and a separate site focused on vegan cupcakes, each one of these sites should have a unique Property and its own set of Views.
However, if you have an interior design business, and it has both a blog and a store site set up under separate domains (i.e. www.JoesFancyInteriorsBlog.biz and www.JoesShopForGoodHouseStuff.com), you may want to consider using the same Property and tracking code for both. This relates to something called cross-domain tracking.
It can be complicated to set up, but worth it for site owners with a 3rd party shopping cart or multiple closely related sites.
If you plan to manage Google Analytics for multiple businesses, give each business its own account.
This policy makes it easier to pass off ownership of the account to the business itself if you’re working in a contract or agency role; respecting a business’s ownership of its site data is an important facet of responsible data management, and one that will make your life ultimately easier.
Unlock Hidden Power Features at the Property Level
At the Property (or website) level are key tools, and a lot of settings to influence the reports you have available to you.
Under the Property Settings, you’ll see the option to rename your Property, update the default URL, select a default View, set your Industry Category, and then it gets into the good stuff.
There are two major items within the Property Settings page:
- Display Advertiser Features (aka Demographic and Interest Reporting)
- In-Page Analytics (or enhanced link attribution)
The first enables a suite of reports that provide Google-based demographic and categorical interest data on your visitors, and allows you to use that data to create remarketing lists and research for your display advertising campaigns with AdWords; this data is also useful in crafting campaigns in any other display platform that leverages demographic data for targeting.
The second feature, In-Page Analytics enables a reporting feature that allows you to see your traffic behavioral data overlaid on your actual website, highlighting which internal links, navigation, and actions are most used.
Laser Focus Remarketing with Demographics and Interest Reporting
After the basic options on your Property Settings page, you’ll see a few more detailed options with descriptions and large On/Off buttons. The first of these options, under Display Advertiser Features, unlocks a suite of reporting and Remarketing tools that no online marketer should be without.
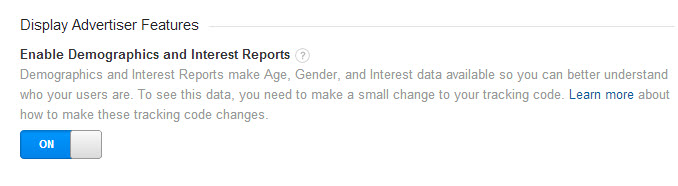
By updating your privacy policy, Google Analytics tracking code, and turning on Demographic and Interest Reports, AdWords users who link their Analytics accounts gain the ability to create Remarketing lists based on precisely segmented visitor data. With this feature enabled, every aspect of your site traffic can be used to build targeted remarketing lists.
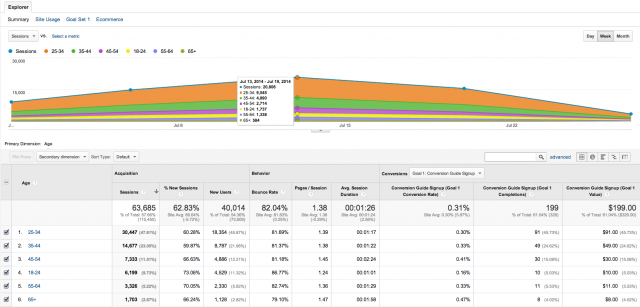
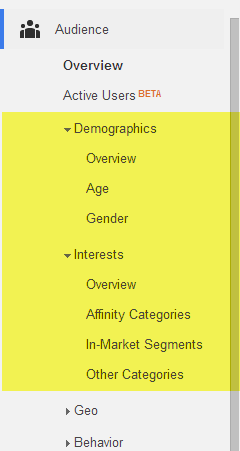
In addition to this major AdWords benefit, age, gender, and categorical interest data becomes visible through two sets of reports located under the Audience tab.
Now, I need to reiterate, to actually access and use these features, you will not only have to turn the option on but you will also have to make a change to your privacy policy and your tracking code. (See why we didn’t deploy the tracking code yet?)
The instructions for updating your tracking code are really simple, even if you aren’t familiar with code. Add the following bolded line between the “create” and “send” lines of your tracking code, as shown below.
<script>
(function(i,s,o,g,r,a,m){i['GoogleAnalyticsObject']=r;i[r]=i[r]||function(){
(i[r].q=i[r].q||[]).push(arguments)},i[r].l=1*new Date();a=s.createElement(o),
m=s.getElementsByTagName(o)[0];a.async=1;a.src=g;m.parentNode.insertBefore(a,m)
})(window,document,'script','//www.google-analytics.com/analytics.js','ga');
ga(‘create’, ‘UA-XXXXXX-XX’, ‘example.com’);
ga(‘require’, ‘displayfeatures’);
ga(‘send’, ‘pageview’);
</script>
</script>
To read more about how powerful Demographics & Interests Reports are, check out this excellent article on Online Behavior. To learn more about creating remarketing lists, click here. (Trust me, you’ll be happy you did.)
But we aren’t done making tracking code changes, so don’t put your tracking code on your website just yet.
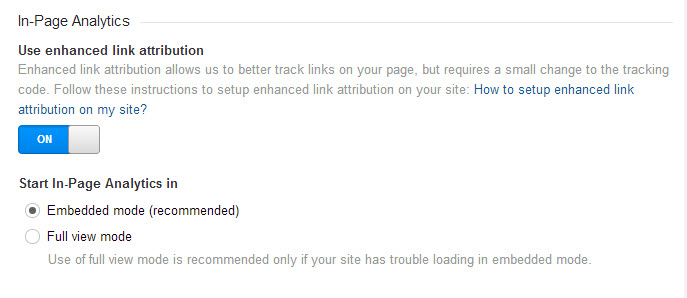
Explore Your Site For Top Performing Links with Enhanced Link Attribution
This powerful evaluation tool allows you to see distinct information for each instance of a link on your pages that you can access from the In-Page Analytics link at the bottom of the Behavior reports menu.
This information is vital to anyone wanting to improve their user experience and their power to persuade visitors.
For example: You’ve set up a landing page that repeats the call to action link to your sales page multiple times on the page: in the header, in a CTA button, twice in the body copy, and once in the footer.
Enhanced Link Attribution will allow you to view your page and see which link drove the most traffic to your sales page.
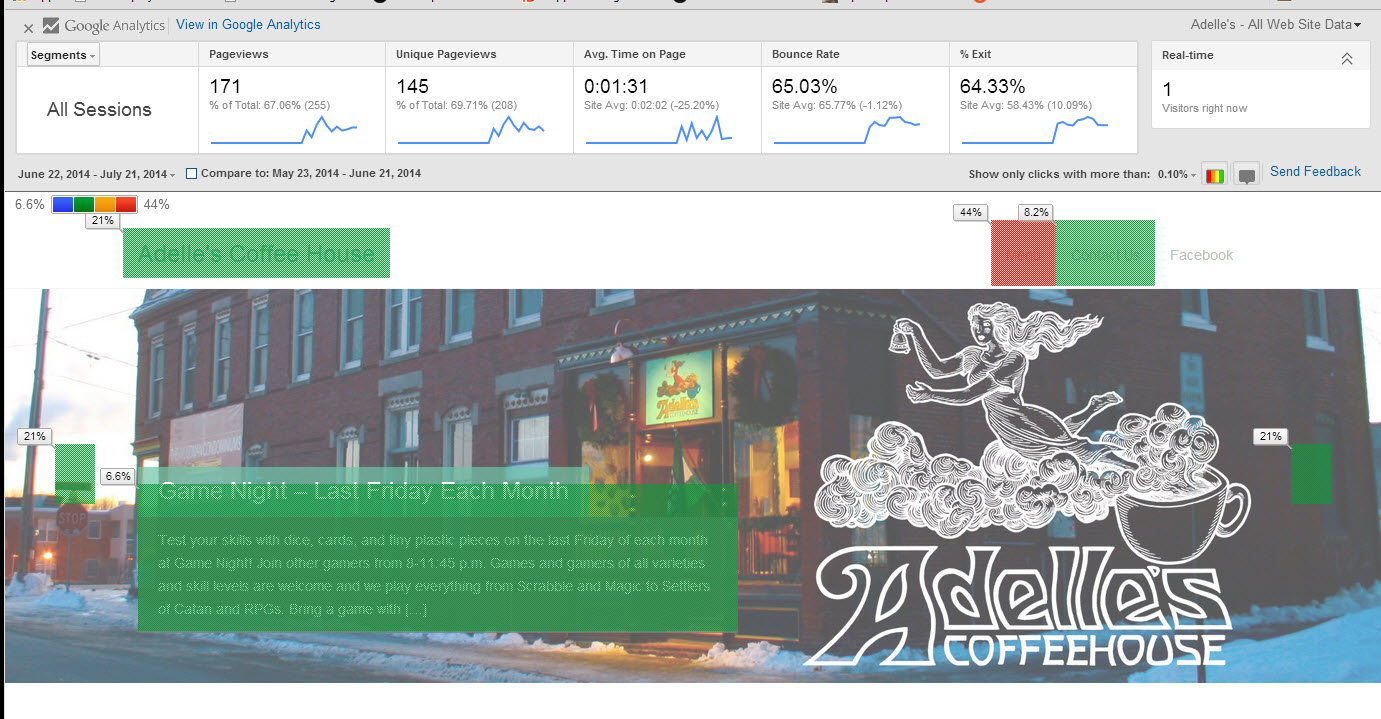
Example of a In-Page Analytics in “full view” mode, with color highlights that help call out the more or less popular links on the page, with cool colors (blue, green) representing least popular links and warm colors (orange, red) representing most popular links.
In-Page Analytics allows for the tracking of buttons, menus, and javascript-based actions, and detection of elements that drive visitors to multiple destinations e.g. a search box.
This requires another tracking code change to function. Just add the following line directly after the new line you added to turn on Demographic & Interest Reports. Like this:
<script>
(function(i,s,o,g,r,a,m){i['GoogleAnalyticsObject']=r;i[r]=i[r]||function(){
(i[r].q=i[r].q||[]).push(arguments)},i[r].l=1*new Date();a=s.createElement(o),
m=s.getElementsByTagName(o)[0];a.async=1;a.src=g;m.parentNode.insertBefore(a,m)
})(window,document,'script','//www.google-analytics.com/analytics.js','ga');
ga(‘create’, ‘UA-XXXXXX-XX’, ‘example.com’);
ga(‘require’, ‘displayfeatures’);
ga(‘require’, ‘linkid’, ‘linkid.js’);
ga(‘send’, ‘pageview’);
</script>
</script>
(Note: Do not copy and paste the full example code above. Copy the code from the Tracking Info page in the Property section of your account and add in the highlighted code from the example. This will ensure you don’t accidentally erase or leave out critical tracking information.)
The bold text is our Demographic & Interest reports feature, and the bold red text is the snippet needed to activate Enhanced Link Attribution. Two easy changes turn on an entire suite of powerful tools. With both of these changes to your tracking code in place, now you can deploy your tracking code on your website.
Most people will be using code that looks like the example script above. It is the “Universal” version of Google Analytics and it uses a file called analytics.js. This may cause an issue that makes the following error display when trying to load In Page Analytics:
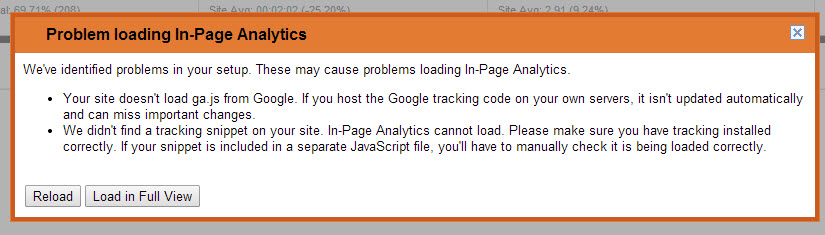
You can get around this by clicking Load in Full View, which will open a new tab in which you see your entire site with the controls and page stats shown above it, and stat bubbles over links & important features.
To stop that error message and use full view mode every time, go back to your Property Settings page and select the “Full view mode” option.
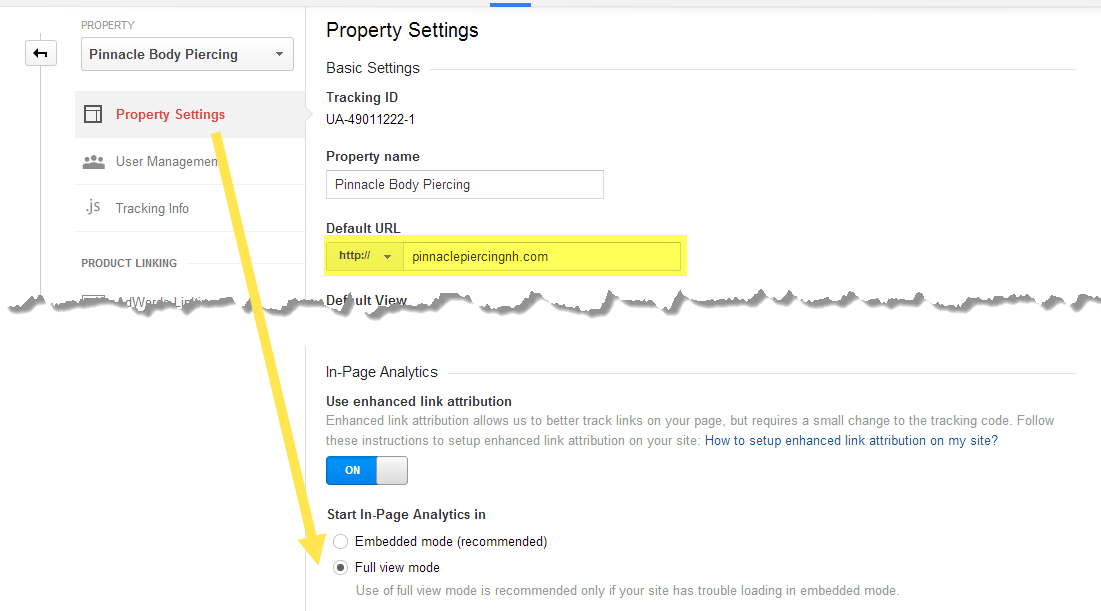
One more important setting to keep in mind: Be sure to set your Default URL correctly for your website.
The box to enter the info is highlighted in the screenshot above. In this example, the site does not use the www. prefix so I have left it out. Make sure that www. is included if your site always redirects to that version, or leave it out if your site always redirects to the non-www version of your domain.
Chrome users: Grab the Page Analytics Chrome Extension to get the full view In-Page Analytics experience without having to visit Google Analytics first, along with other quick data access perks like the real time count of active visitors.
Connect the Dots to Profitable Data: Adding Webmaster Tools, AdSense, and Adwords
Connect the Dots to Profitable Data: Adding Webmaster Tools, AdSense, and Adwords

3 Common Mistake in Comparing WordPress and Blogger
ReplyDelete3 Steps to Use Custom Domain Name on Blogger Blogs
4 Simple Step to Create FeedBurner Feed for Blogger Blog
Add AdSense below First Post of Index/Label Pages in Blogger
Add Gadget/Widget Sections Anywhere In Blogger
Adsense & SEO Friendly Custom Robots.txt for Blogger Blogs
Blogger Blogs Now Have Full XML Sitemap
Blogger Updates Image and Video Uploader in Post Editor
Conditional Tags for Blogger Page Types
Google AdWord Campaigns Tab Introduced in Blogger